Owl Applique
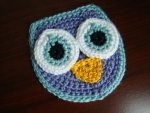
Owl AppliqueDesigned by Crafts by Starlight
All Rights Reserved
Easy Owl Appliqué! So cute fun for bags, Hats,
blankets, it is made from light 3 size yarn. It measures about 4” across.
Materials: Light 3 sized yarns, Black, turquoise,
Purple, white and size F hook.
SL = Slip stitch
SC = Single Crochet
DC = Double Crochet
CC = Change Color
Sp(s) = Space(s)
Eyes (Make 2)
Base (black): Ch 3
Rnd 1: 7 SC in 1st Ch made, SL to
1st SC made, CC to blue
Rnd
2 (Turquoise): Ch 1, 2 SC in each sp around, SL to 1st SC made, CC to white (14
sts).
Rnd 3 (white): CH 1, 2 SC in each sp around, SL to 1st SC made, tie off
and hide string.
Head (Purple)
Base: CH 3
Rnd 1: 7 SC in 1st Ch made, SL to 1st SC made, CH 1 turn.
Rnd 2: 2 SC in each sp around, SL to 1st SC made, CH 1 turn. (14)
Rnd 3: 2 SC in each sp around, SL to 1st SC made, CH 1, turn. (28)
Rnd 4: *6 SC, 2 SC in next sp, Rep from * around, end with 3 SC, SL to 1st SC
made, Ch 1, turn.
Rnd 5: (2 SC in next sp, 17 SC) Twice, SL to 1st SC made, CH 1, turn.
Rnd 6: 9 SC, 2 SC in next sp, 20 SC, 2 SC in next sp, 14 SC, SL to 1st SC
made, Ch 1, turn.
Rnd 7: 4 SC, 2 SC in next sp, 11 SC, Sk 1 sp, 5 DC in next sp, SK 1 sp, 6 SC,
Sk 1 sp, 5 DC in next sp, SK 1 sp, 11 SC, 2 SC in next sp, 2 SC, SL to 1st SC
made, CC to turquoise.
Rnd 8 (turquoise): 5 SC, 2 SC in next sp, 12 SC, 3 SC in next sp, 10 SC, 3 SC
in next so, 12 SC, 2 SC in next sp, 5 SC, SL to 1st SC made, tie off and hide
string.
Beak (Orange)
Base: Ch 6
Row 1: SC, Sk 1 sp, 5 DC in next sp, Sk 1 sp, SC, CH 1, turn
Row 2: 3 SL, 3 SC in next sp, 3 SL, SL around the side of motif to other side
of row 2, tie off hide string.
Depending on what you are using the appliqué for you can assemble the face in
two different ways. Sew the face by String or by hot glue gun. That is
completely up to you.
Happy Crocheting!
Crochet Towel Topper
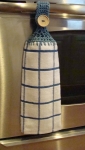
Crochet Towel TopperDesigned by Crafts by Starlight
All Rights Reserved
Simple
MATERIALS: Blue hand towel, Blue Red Heart Yarn,
Nail, Size H hook, Large Wood Button.
CH = Chain
SC = Single Crochet
DC = Double Crochet
SL = Slip Stitch
First: Fold the hand towel in half
Second: With a
washable marking pencil lightly mark along the top of the hand towel every ½
inch. (Note to keep towel in place a safety pin may be used to keep hand towel
in place.)
Third:
Place a nail on top of each mark made and gently push the nail through the hand
towel. Once through stretch the hole wide enough to fit the hook. (31 stitches)
Now you are ready to crochet the towel topper!!
Row 1: SC in first hole on very right of the hand towel, CH 1, *SC in next
hole, CH 1, Rep across until SC in last hole on the hand towel. CH 2, Turn (31
stitches).
Row 2: DC across in each CH spot, CH 2, Turn (31 stitches).
Row 3: Dc in every other DC across, Ch 2, turn (16 Stitches).
Row 4: DC in first stitch and then in every other DC across.CH 2, Turn (8
Stitches).
Row 5: DC in every other DC across, CH 2, Turn (4 stitches).
Row 6: DC across, Ch2 turn (4 stitches).
Row 7-22: SC across, Ch 1, turn (4 Stitches).
Row 23: Ch 5 and attach the chain to end of the row with a SL, Ch 1,
Turn.
Row 24: 10 SC in the inside of Ring. SL to finish off.
Finishing Stitch: Attach to right side of Row 1, SC up the side, top, and
down the other side. This will give the Towel a clean finished look. Tie off,
Hide string.
Lastly: Sew on a button to the base of the stem. Hang it up and it is ready
to use.
She has really cute things. Here is a link to her blog http://www.craftsbystarlight.blogspot.com/
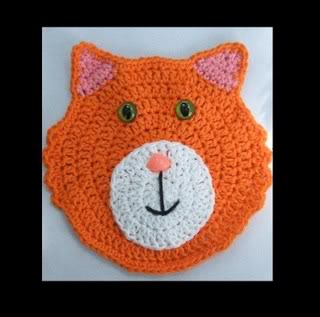
Fat Tabby Potholder/Hotpad **Decorative use only. Eyes and nose will melt when exposed to heat! For a functional potholder, only use natural fibers.** Materials: 2oz in main color (mc), worsted weight cotton yarn small amount white worsted weight cotton yarn 2- 18mm cat eyes 1- 15mm pink animal nose H hook Front Face: With mc, ch4. Rnd 1: 12 dc in 4th ch from hook. Join with sl st in first dc. Ch 3, do not turn. Rnd 2: 2dc in each st around. Join with sl st in first dc. Ch 3, do not turn. Rnd 3: (dc in next st, 2dc in next st) x 12. Join with sl st in first dc. Ch 3, do not turn. Rnd 4: (dc in next 2 sts, 2dc in next st) x 12. Join with sl st in first dc. Ch 3, do not turn. Rnd 5: (dc in next 3 sts, 2dc in next st) x 12. Join with sl st in first dc. Ch 3, do not turn. Rnd 6: (dc in next 4 sts, 2dc in next st) x 12. Join with sl st in first dc. End off. Ear 1: Rnd 7: With pink, join with sc in any st of rnd 6 of face. sc in next 5 sts. Ch 1, turn. Rnd 8: sc across. Ch 1, turn. Rnd 9: sc2tog, sc in next 2 sts, sc2tog. Ch1, turn. Rnd 10: sc across. Ch 1, turn. Rnd 11: sc2tog, twice. Ch 1, turn.
Rnd 12: sc across. Ch 1, turn. Rnd 13: sc2tog. End off, weave in ends. Ear 2: Rnd 7: With pink, join with sc in 9th st from end of row 7 of first ear. sc in next 5 sts. Ch 1, turn. Rnd 8: sc across. Ch 1, turn. Rnd 9: sc2tog, sc in next 2 sts, sc2tog. Ch1, turn. Rnd 10: sc across. Ch 1, turn. Rnd 11: sc2tog, twice. Ch 1, turn. Rnd 12: sc across. Ch 1, turn. Rnd 13: sc2tog. End off, weave in ends. Muzzle: With white, ch4, Rnd 1: 12 dc in 4th ch from hook. Join with sl st in first dc. Ch 3, do not turn. Rnd 2: 2dc in each st around. Join with sl st in first dc. Ch 3, do not turn. Rnd 3: (dc in next st, 2dc in next st) x 12. Join with sl st in first dc. End off, leaving 18"+ for sewing. Weave in first end. ****Assemble Face: Apply safety 18mm cat eyes to Rnd 4 of face as shown in picture. Secure eyes with metal washers on back of face. Push nose through bottom of rnd 3 just above rnd 2 of muzzle and through center of rnd 1 of face. Secure nose with plastic washer on back of face. Sew muzzle to face by weaving in and out of edge of sts of rnd 3. Secure with knot, weave in ends. Sew on mouth as shown in picture. Sew on whiskers if desired.**** Back Back of head: With mc, ch4. Rnd 1: 12 dc in 4th ch from hook. Join with sl st in first dc. Ch 3, do not turn. Rnd 2: 2dc in each st around. Join with sl st in first dc. Ch 3, do not turn. Rnd 3: (dc in next st, 2dc in next st) x 12. Join with sl st in first dc. Ch 3, do not turn. Rnd 4: (dc in next 2 sts, 2dc in next st) x 12. Join with sl st in first dc. Ch 3, do not turn. Rnd 5: (dc in next 3 sts, 2dc in next st) x 12. Join with sl st in first dc. Ch 3, do not turn. Rnd 6: (dc in next 4 sts, 2dc in next st) x 12. Join with sl st in first dc. Do not end off. Ear 1: Rnd 7: Continuing from rnd 6 of back, ch 1, sc in same st and in next 5 sts. Ch 1, turn. Rnd 8: sc across. Ch 1, turn. Rnd 9: sc2tog, sc in next 2 sts, sc2tog. Ch1, turn. Rnd 10: sc across. Ch 1, turn. Rnd 11: sc2tog, twice. Ch 1, turn. Rnd 12: sc across. Ch 1, turn. Rnd 13: sc2tog. End off, weave in ends. Ear 2: Rnd 7: Join with sc in 9th st from end of row 7 of first ear. sc in next 5 sts. Ch 1, turn. Rnd 8: sc across. Ch 1, turn.
Rnd 9: sc2tog, sc in next 2 sts, sc2tog. Ch1, turn. Rnd 10: sc across. Ch 1, turn. Rnd 11: sc2tog, twice. Ch 1, turn. Rnd 12: sc across. Ch 1, turn. Rnd 13: sc2tog. End off, weave in ends. Outer Edge/Joining: **Work through front and back of face with wrong sides together (front of face facing up), matching up coordinating stitches.** Rnd 7: Join with sl st in corner of first ear. Ch1, sc in same st. sc around ear with sc at end of each row and 3 in top corner. sc in other corner of ear where rnd 7 of ear meets rnd 6 of face. sc in next 3 sts, 2sc in next st, sc in next 4 sts. sc in corner of ear where rnd 7 of ear meets rnd 6 of face. sc around ear with sc at end of each row and 3 in top corner. sc in other corner of ear where rnd 7 of ear meets rnd 6 of face. sc in next 5 sts. **(dc, ch1, dc) in next st, sc in next st.* Repeat from ** to * 3 more times. (sc in next 5 sts, 2 sc in next st) x 4. sc in next 3 sts. Repeat ** to * 4 times. sc in next 4 sts. sl st in beg st, end off, weave in ends. ****Glue or sew picture hanger to back if desired.****
